Maximum-Tech.net is reader-supported. When you buy something through links on our site, we may earn an affiliate commission. As an Amazon Associate, I earn from qualifying purchases
How To Change CPU Frequency In BIOS – An Easy Guide (2022)
I’m certain you must have heard about CPU overclocking, and that’s what has brought you here looking for ways to overclock yours.
But, how to change CPU frequency in BIOS? Well, you can quickly adjust the multiplier in the BIOS menu to change the processor Hertz. Thus, boosting its performance. More details on adjusting the CPU’s frequency are shared below in the article.
Also, adjusting the frequency requires no upgrades and provides instantaneous results, which are the two primary reasons to overclock the CPU.
In addition, I’ve covered some other essential information you should know before you change the processor’s frequency and expect a boost in performance.
Without any further ado, let’s get straight to the point.
Contents
Determine the CPU Health Before You Begin
Changing the processor’s frequency can either result in a performance surge, or the processor can end up overheating quickly.
It’s the main reason why I want you to evaluate the processor’s health before you change the frequency using the BIOS menu.
Conduct a System Stress Test
Performing a system stress test helps you understand the stability of the processor at the current clock speed.
I prefer using Prime 95 for doing stress tests, and it gives precise insights. The software puts 100% load on all CPU cores, and that’s when you can figure out if it remains stable on full load.
Check out the useful video below for more info:
In case you encounter any errors while overclocking the CPU, it would be wise to drop the idea of increasing the frequency. Note that, most of the time, overclocking has a negative impact on your CPU lifespan.
Check the Temperature Of The Processor
Overclocking the CPU boosts the performance, but the rise in temperature is inevitable. Especially if the processor is not one that’s capable of multitasking.
So, before you increase the processor’s frequency, it would be great to know the exact temperature.
We recommend using “Core Temp,” as it’s an easy way to get the exact temperature the processor is operating at.
Download the tool, set it up, and you can quickly get critical insights about the CPU. On a side note, don’t miss finding out which is the best processor under $300 this year.
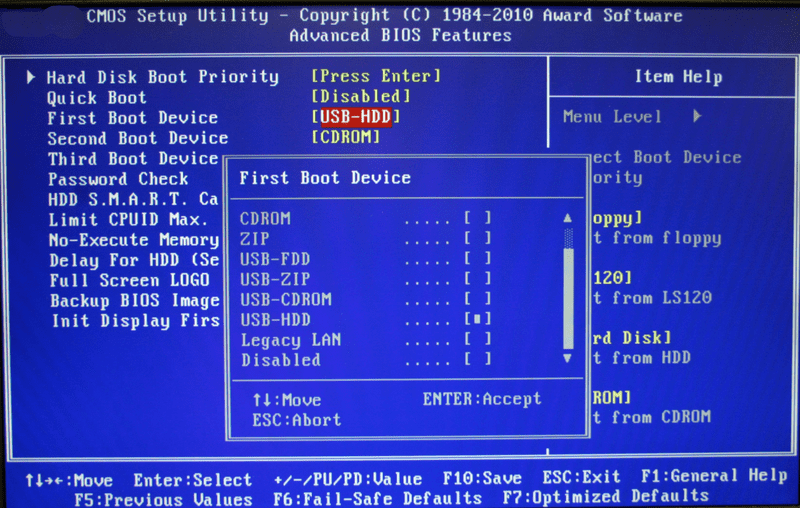
If you are running Windows 10 operating system, you can check the temperature using the BIOS menu. Follow the steps below:
Turn on your PC and press F12, ESC, F2, or DEL as the system boots.
Using these key combinations will help you enter the BIOS menu.
Next, you can check the processor temperature on the right side of the menu’s main screen.
When you check the CPU temperature using BIOS, you can only check the temperature at a particular point. Once the system boots, you cannot check the temperature. So we recommend you to use software like Core Temp to have quick temperature insights whenever you need them.
The maximum temperature range per CPU core is 105-110°C. You should install a good CPU cooler to keep the unit cool when you overclock it.
And if you need to code on your computer, you might need that boost in the clock speed.
PC Settings You Should Know to Change the CPU Frequency in BIOS
The BIOS or the basic input output system menu comes loaded with extensive options and features.
But you only need to access a few of them to change the processor’s frequency. Also, the layout of the BIOS menu can be different depending on the motherboard.
However, some features remain standard across all BIOS menus. Below listed are the PC settings you should know for adjusting the processor’s frequency.
CPU vCore Voltage
It’s the total power that the CPU core receives.
Increasing the core voltage results in upping the processor’s performance by enhancing the headroom the cores need to run at maximum speed.
Also, it improves the bus speed or FSB speed, required to achieve maximum performance from the CPU.
CPU Core Ratio or CPU Ratio
The CPU core ratio is something that helps determine the processor’s overall speed. You can calculate the overall processor speed multiplying this ratio to BCLK (base clock speed).
Users can change this setting for individual cores or can apply it to all cores as required.
Ring Voltage
Ring voltage or CPU cache also impacts the voltage supplied to the core. This setting is helpful in keeping the processor’s performance stabilized while BIOS overclocking it. On a sidenote, a nasty issue that many readers face is that their PC restarts before BIOS.
However, you cannot modify it for particular cores, and the voltage for all cores will change as you adjust this setting.
Ring Ratio
Ring Ratio helps adjust the frequency of different processor components, including the memory controller or cache.
With this setting, you can bring the CPU cache speed closer to the CPU speed to get better performance from the processor.
How to Change CPU Frequency in BIOS: Step-by-step Instructions
Now that you know about the core vitals of the processor and the BIOS settings, that’ll help you adjust the frequency.
You are all set for the end game! Below, I’ve listed a step-by-step guide to adjusting the processor frequency using the BIOS menu.
Turn off your computer if it’s on, or else turn it on. As the computer starts, press a combination of Del and F10. If this combination does not work, use Del + F2.
Pressing this combination will help you open the BIOS menu controls. Click on F2 to enter the BIOS setup once you see the menu displayed on the screen.
The layout of the BIOS varies depending on the motherboard, but you are likely to see OC/Overclocking or Advanced CPU Core Settings on display.
#2 Select Between Automatic and Manual Overclocking
The BIOS setup may have an Automatic Overclocking function, as most motherboard manufacturers offer this feature.
We’ve seen this feature as “OC Level” in some PCs.
Automatic overclocking helps you boost the clock speed frequency while remaining in a safe zone. As a result, you don’t have to worry about overheating and other such issues.
I’ve explained the manual BIOS overclocking in the next step, which helps you adjust the clock speed as per your needs.
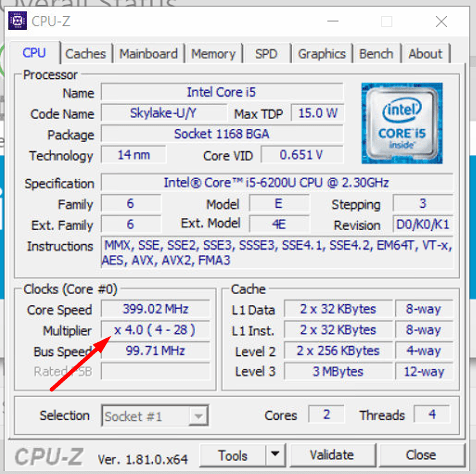
#3 Keep Adjusting the CPU Multiplier
When you adjust the CPU multiplier, you change the frequency that affects the overall performance of the machine.
As you increase the multiplier setting, it increases the clock speed, and that’s ultimately what you want.
You should gradually increase the multiplier by tapping on the + or the number keys on the keyboard.
Be slow with this process, as it may take some time for the processor cores to accommodate higher clock speeds when they get fed with higher voltage
Increase the multiplier for a particular CPU core, and then proceed with increasing it for the other cores as well.
We come across some PC users that overclock all cores, but you should avoid that. The more cores you overclock, the more unstable the performance can get. Also, the CPU will heat up quickly, and you need a bigger cooler to keep the temperature under control.
Once done with adjusting the multiplier for most cores, you can save the settings.
Then, reboot the computer so that the processor cores can get a fresh start, and you get more stability in the performance.
#4 Perform a Stress Test, Again
How can you be so sure that the overclocked CPU will perform efficiently?
Well, the only way to be certain about it is by stress testing. Start with checking the CPU z. Check if all the tweaks that you have made are running successfully.
Next, use Core Temp to monitor the temperature of the CPU and ensure it is below the red line.
If the temperature surpasses the red line, you need to follow the steps again and reduce the clock speed using the multiplier setting.
If the temperature is okay, use Prime 95 for around 20 minutes, and evaluate the performance. The stress test will end up in the following three results:
If the temperature is fine, it means there’s still some scope for adjusting the CPU frequency. You can increase the multiplier by a few notches to get better performance.
If the stress test ends up showing high temperatures, you need to lower the multiplier. Follow all steps again, and this time press “-” to reduce the multiplier.
Pros and Cons of Overclocking the CPU
This article would be incomplete without the advantages and disadvantages of overclocking the processor.
Also, it’s important for you to know the best and worst that may happen when you try to adjust the CPU frequency.
Pros
Here are the most common advantages:
You get a boost in the performance
No need to spend money on a new processor
Quick and instant results
You have complete control over the frequency
Cons
And here are the disadvantages:
It may void the manufacturer’s warranty in some scenarios
The CPU may get damaged due to overheating
Better Performance Awaits You!
After conducting all the tests mentioned in the article, you are all set to enjoy better performance and fewer lags.
We still recommend you check the CPU’s temperature occasionally. Also, do stress tests after some time to ensure the CPU is working fine after the frequency upgrades.
Stay tuned for such informative posts on how to make your CPU’s performance better without spending a fortune!
Frequently Asked Questions
Let’s examine the most popular questions related to the topic.
Is there any other way to change CPU frequency without the computer’s BIOS?
If you don’t want to go the BIOS way, you can still change the clock speed. However, this method can be pretty costly as it involves a CPU upgrade. This should only be the case when you aren’t happy with the current CPU Hz even after you have upgraded it.
Does overclocking hinders the CPU lifespan?
Well, this is a challenging question and depends on several factors. If you try to overclock the CPU beyond its limits, it will surely limit the lifespan. Overclocking the CPU increases the power consumption which produces more heat, increase, and this heat is not good for the processor. Always do a stress test and temperature check before and after adjusting the processor frequency to be sure everything’s under control.
How to get rid of black screen errors when changing CPU frequency in BIOS?
You need to increase the CPU core voltage to prevent the black screen error. Or you can try resetting the BIOS to the default settings. Every motherboard has a “Reset CMOS” or “Clear CMOS” button. Hold the button, and the BIOS control setup will get back to the default settings. You can then follow the steps to increase the CPU multiplier and change the frequency.
Is it safe to overclock the CPU?
Yes, it is safe to overclock a processor, provided you stay under the limit. Modern processors can handle overclocking pretty well. Before you go ahead with the steps explained in this article, it would be great to read more if you can safely overclock the CPU without hampering system stability.
We use cookies on our website to give you the most relevant experience by remembering your preferences and repeat visits. By clicking “Accept”, you consent to the use of ALL the cookies.
This website uses cookies to improve your experience while you navigate through the website. Out of these, the cookies that are categorized as necessary are stored on your browser as they are essential for the working of basic functionalities of the website. We also use third-party cookies that help us analyze and understand how you use this website. These cookies will be stored in your browser only with your consent. You also have the option to opt-out of these cookies. But opting out of some of these cookies may affect your browsing experience.
Necessary cookies are absolutely essential for the website to function properly. These cookies ensure basic functionalities and security features of the website, anonymously.
Cookie
Duration
Description
cookielawinfo-checkbox-analytics
11 months
This cookie is set by GDPR Cookie Consent plugin. The cookie is used to store the user consent for the cookies in the category "Analytics".
cookielawinfo-checkbox-functional
11 months
The cookie is set by GDPR cookie consent to record the user consent for the cookies in the category "Functional".
cookielawinfo-checkbox-necessary
11 months
This cookie is set by GDPR Cookie Consent plugin. The cookies is used to store the user consent for the cookies in the category "Necessary".
cookielawinfo-checkbox-others
11 months
This cookie is set by GDPR Cookie Consent plugin. The cookie is used to store the user consent for the cookies in the category "Other.
cookielawinfo-checkbox-performance
11 months
This cookie is set by GDPR Cookie Consent plugin. The cookie is used to store the user consent for the cookies in the category "Performance".
viewed_cookie_policy
11 months
The cookie is set by the GDPR Cookie Consent plugin and is used to store whether or not user has consented to the use of cookies. It does not store any personal data.
Functional cookies help to perform certain functionalities like sharing the content of the website on social media platforms, collect feedbacks, and other third-party features.
Performance cookies are used to understand and analyze the key performance indexes of the website which helps in delivering a better user experience for the visitors.
Analytical cookies are used to understand how visitors interact with the website. These cookies help provide information on metrics the number of visitors, bounce rate, traffic source, etc.
Advertisement cookies are used to provide visitors with relevant ads and marketing campaigns. These cookies track visitors across websites and collect information to provide customized ads.


![Does CPU Matter For Streaming In 2022? [A Definitive Guide]](data:image/svg+xml,%3Csvg%20xmlns='http://www.w3.org/2000/svg'%20viewBox='0%200%20150%20150'%3E%3C/svg%3E "Does CPU Matter For Streaming In 2022? [A Definitive Guide]")
![Does CPU Matter For Streaming In 2022? [A Definitive Guide]](https://maximum-tech.net/wp-content/uploads/2022/05/Does-CPU-Matter-For-Streaming-150x150.jpg "Does CPU Matter For Streaming In 2022? [A Definitive Guide]")
![How To Change CPU Fan Speed Without Bios? [Easy Guide]](https://maximum-tech.net/wp-content/uploads/2022/05/How-To-Change-CPU-Fan-Speed-Without-Bios-150x150.jpg "How To Change CPU Fan Speed Without Bios? [Easy Guide]")
![Best CPU For Programming In 2022 [7 Picks For Every Budget]](https://maximum-tech.net/wp-content/uploads/2022/02/best-cpu-for-programming-150x150.jpg "Best CPU For Programming In 2022 [7 Picks For Every Budget]")
![How To Know If CPU Is Dead? [A Comprehensive Guide 2022]](https://maximum-tech.net/wp-content/uploads/2022/04/How-To-Know-If-CPU-Is-Dead-150x150.jpg "How To Know If CPU Is Dead? [A Comprehensive Guide 2022]")
![Best CPU for Minecraft In 2022 [7 Worthy Picks Reviewed]](https://maximum-tech.net/wp-content/uploads/2022/04/best-cpu-for-minecraft-150x150.jpg "Best CPU for Minecraft In 2022 [7 Worthy Picks Reviewed]")
![7 Best CPU Under 0 - A Complete Buyer's Guide [2022]](https://maximum-tech.net/wp-content/uploads/2022/01/best-cpu-under-200-150x150.jpg "7 Best CPU Under 0 - A Complete Buyer's Guide [2022]")